Loading
HOW TO BUILD YOUR OWN VIVARIUM
WRITTEN BY: NICK GILCHRIST
HOW TO BUILD YOUR OWN VIVARIUM
Hopefully the following info may prove useful to someone! I have detailed extensively below. how to construct your own Vivarium, using only 1 sheet of Furniture board (Contiboard or similar). To enable a relatively accurate pricing guide. I have used the HOMEBASE website as a supplier of all but a few of the items required to construct the unit to completion.
This will be a 30"long x 15" deep x 18" high Vivarium (or in fact its metric equivalent) The reason for selecting this size as an example, is based on the ability to build this unit using only one sheet of board and has very little waste in regards excess offcuts and so therefore is the most coste effective. Also because a 30" unit is a suitably large enough unit for many species.
I have provided links to all products used to assist anyone interested in buildig this unit themselves, or indeed a larger unit using the same format. Obviously it may well be cheaper to purchase the products elsewhere than HOMEBASE. but I have priced this as if you have none of the items required and are starting from scratch as a first time builder.
This is aimed at achieving a professional looking Vivarium for the minimum of outlay. to a simple design. with instructions for those who may not be the worlds greatest DIY expert!
So..thats said......lets begin.
TOOLS REQUIRED FOR THIS
DRILL WITH A 3mm WOOD BIT
A HAMMER
PHILLIPS HEAD SCREWDRIVER
JIGSAW
JUNIOR HACKSAW
A COUNTERSINK TOOL OR YOU CAN USE A LARGE WOOD DRILL BIT
AN IRON
STANLEY KNIFE
STAGE 1
WALK INTO HOMEBASE!!!
Select whichever wood effect furniture board you like, there are several choices. You will require 1 sheet measuring 2440mm x 457mm for this project. (8FT X18" in old imperial measurements approx)
The cost for this single sheet at HOMEBASE is around £23.00 (SEE LINK)
Homebase - www.homebase.co.uk:
You will also need a small precut sheet of WHITEFACED HARDBOARD . these are available in precut 3ft x2ft sizes for around £5 OR LESS
NOW ONTO THE CUTTING DEPARTMENT.
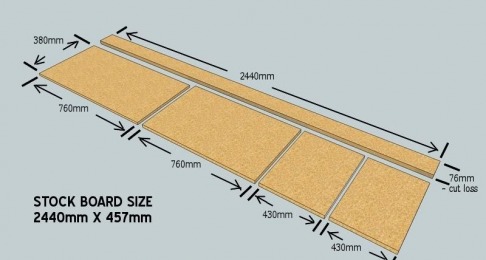
Cut the sheet as in the diagram shown below.
Starting with cutting a board EXACTLY 380mm wide leaving the long thin strip shown..(We will use this later)
The piece you now have should measure 2440mm x 380mm. from this cut lengthways 2x pieces EXACTLY 760mm long. then 2 x pieces EXACTLY 430mm long. there will be a tiny offcut.
Then retuning to the long strip, cut 2 x pieces EXACTLY 430mm long. the remainder is offcut surplus,
Finally . have the WHITE FACED HARDBOARD sheet cut to a piece 760mm x 460mm.
Thats all your wood done...you should now have the following.
2 x 760mm X 380mm ( TOP/BOTTOM)
2 x 430mm X 380mm (SIDES)
2 x 730mm X 77mm approx (TOP.BOTTOM FRONT PANELS)
1 x 760mm x 460mm WHITE FACED H/B BACK
You will now need to grab a trolley. and purchase the following items - ALL ARE AVAILABLE IN HOMEBASE. See links for prices and pic
1 x TUBE OF EVO STIK CONTACT ADHESIVE (SMALL)
Evo-Stik Impact Adhesive - 33g from Homebase.co.uk
20 x 30mm X No 8 ZINC PLATED SCREWS (or SUPASCREWS)
Zinc Plated Screws - 30mm - 25 Pack from Homebase.co.uk
1 x PACK OF 1" PANEL PINS
Panel Pins - 20mm - 100g from Homebase.co.uk
2 X ROLLS OF IRON ON FURNIYURE BOARD EDGING TAPE (TO MATCH)
Homebase - www.homebase.co.uk
1 X 229mm x 152mm WHITE PLASTIC LOUVRE VENT PANEL
Louvre Vent - Plastic - 229x152mm from Homebase.co.uk
1 X PACK OF PUSH ON SCREW CAPS (COLOURED TO MATCH WOOD)
LINK SHOWS WHITE ONES - BUT THEY ALSO COME IN BROWN TAN
Press Cover - White - 48 Pack from Homebase.co.uk
1 X PIECE OF MED GRADE SANDPAPER
You will also need the following. which I recommend ordering online as they are cheaper - see provided links.
1 X 4FT LENGTH OF DOUBLE TRACK (4mm) TOPandBOTTOM
4ft VIVARIUM GLASS 4mm RUNNERS black top+bottom on eBay (end time 28-Mar-10 23:20:39 BST)
2 X SELF ADHESIVE GLASS DOOR HANDLES
VIVARIUM sliding glass DOOR HANDLES finger pulls BLACK on eBay (end time 08-Mar-10 20:05:23 GMT)
Your shopping list is now complete
LOAD IT UP.........TAKE IT HOME.. SEND THE KIDS/WIFE/DOG OUT FOR THE DAY.........AND LETS BEGIN......
CONSTRUCTION
BOX FRAME
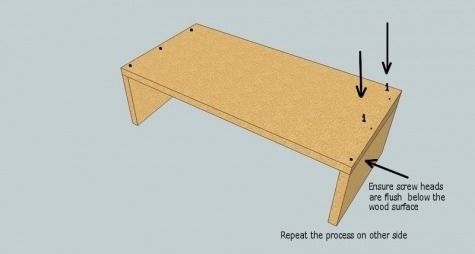
Take one 760mm piece (TOP) and one 430mm piece (SIDE).Place the top panel resting on the edge of the side panel. You will need to support the other end at the same height. if working alone get a stack of books or similar. Ensure the edges are level. then using the 3mm bit, carefully drill 3 holes through the top edge of the top panel into the side panel below. Start in about 50mm from the front edge and 5mm from the outer edge (the panel is 15mm thick) so try to get it somewhere near centre!!!) Drill completely through the top panel..but only fractionally through into the side panel... This is a guide hole for the screws. and to get maximum grip we want the screw to do the work in the lower board. Place 3 holes in this way..one in the centre and the final hole an equal 50mm (2") from the end.
Once the holes are drilled.you will need your COUNTERSINK TOOL.
Go over each hole and ensure that when the screw is in that the head will be flush and not above the surface of the wood..realign the wood again and commence srewing!! start at the end and work along..if at anytime you mess up..or the panel isnt level..start again..drill a better hole..etc keep the screw going in vertical..dont worry if you mess up and have to redrill..we get to cover your mistakes later!!
When this is done.. check all the heads are countersunk properly (run your finger over the screw heads) if they jut out they need to be in further) If you messed up and the guidehole went in to far you might not be able to tighten it down..if this happens redrill another hole and do it again! (This also applies if you drilled a guidehole too close to the edge ) if you do redrill..leave a gap of at least 10mm between the new hole and the old one..hopefully you wont mess up again! but don`t worry you wont be the first!
Repeat this on the other side and then flip over to attach the bottom panel (BOTTOM PANEL SCREWS DO NOT NEED TO BE COUNTERSUNK)
WELL DONE..You made the frame!
FRONT PANELS
Get the 2 facia panel strips, and start with what will be the bottom front of the unit . The panel should fit perfectly into the gap (if correctly cut to the sizes given!
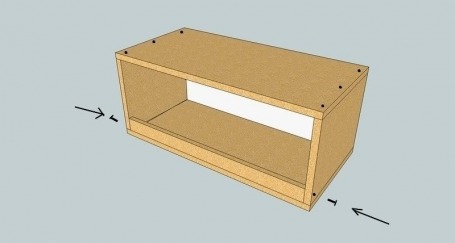
Now drill a single guide hole into the side of the facia piece through the side panel..in the same way you did the others..apply downward pressure to the panel whilst doing this so that its in the correct position.
Then screw in and secure
YOU DO NOT NEED TO COUNTERSINK THIS HOLE - LEAVE THE SCREW HEAD SLIGHTLY EXPOSED
Repeat at the other side.. then flip the unit over onto its top and drill 3 guideholes in the same manner.and secure with 3 more screws. As you are screwing into what will be the bottom of the unit it is not neccessary to countersink these holes on this side (but you can if you wish) thats the bottom plinth in place.
Flip over now and do the same to fit the TOP FRONT PANEL...However when doing this COUNTERSINK THE TOP HOLES.
Now you have got through the 2nd stage!!
FIXING THE BACK /AND VENT.
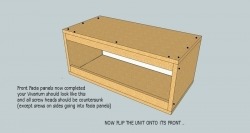
Flip the unit over now onto its front. and place your back board into position..
always using the top of the Viv as your leading edge first..ensure that the panel lip is totally flush and commence tacking!
Hammer in securing panel pins at each corner to hold in place..then work around the unit , placing a panel pin approximately at 3" gaps all the way around (REMEMBER THE WHITE FACE IS DOWN WITH THE BROWN BACKING UP!!)
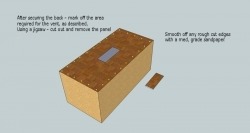
Once all is secure..its time to fit the vent panel...First. take the vent and lie it on the back of the unit front facing you..You can guess this if you want but. best way is use a ruler to get the panel aligned straight.
Then taking a pencil, draw around the outer lip. once you have don this..draw a smaller rectangle within this approximately 1" in from the original. This is the part we need to no cut out.
Grab the drill and using a larger drill bit, drill a hole in each corner of the smaller rectangle. (Big enough to get the jigsaw blade in) Then get cutting!! When removed. go around the inner edges of the new hole with med. sandpaper to smooth off any rough edges. job done.
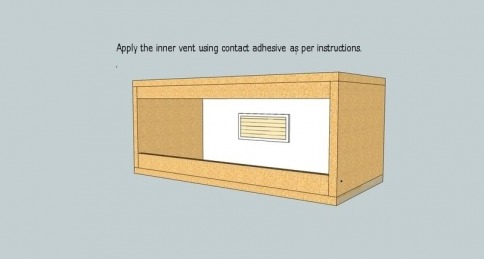
Time to fit the Vent..these do have 4 screw holes, but as the back is thin you will end up with screws sticking out the back..so dont bother!
Instead using your EVO STIK CONTACT ADHESIVE..apply a thin layer to the outer lip on the back of the vent..then do the same inside the vivarium around the cut out area..only a bit mind! Wait 10MINS..Then carefully stick in place..making sure its straight! This will now be totally secure. Always wait 10 mins before applying the 2 surfaces together for the contact adhesive to dry slightly for maximum bonding.
Now you should have got to this stage!!
EDGING
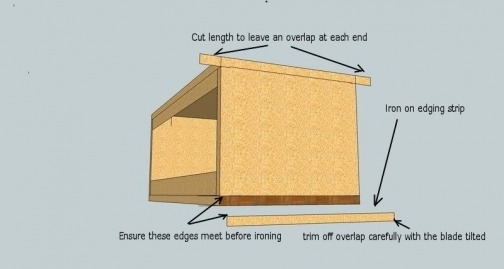
Tip the unit over onto its side..its time to edge those unsightly cut ends! see below.
Tip the unit over onto its side..its time to edge those unsightly cut ends! see below.
You will need a HOT DRY IRON..no steam please! and the STANLEY KNIFE or similar. First cut off 2 pieces of edging. allowing a good 1" overlap at both ends) The edging is always wider than the 15mm thickness of the panel. you need to have the inner edge of the lined up with the bottom edge of the side panel..so the overlap can be trimmed off easily. Now working carefully along. apply the iron to the tape until it is secure..this is pretty instant as soon as you apply heat so get it level first time!! Guide it with your fingers as you work along. FINGERS ON THE LEFT - IRON ON THE RIGHT!!!! -get the tap running just in case!!! When completed, using your knife. trim off the excess first at both of the ends..then trim the excess edge..to do this. angle the knife blade and scrape carefully ..if you keep the blade at an angle you should not cut into the edge of the unit..take your time..
Repeat on all sides...
TOP FINISHING
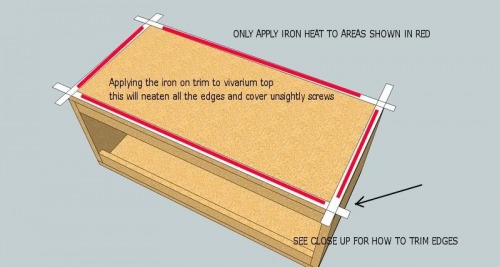
Time to use that 2nd roll of edging..Except this time you dont need to trim any edges...We are now going to hide all those unsightly screw on the top of the unit..and any mistakes you might have made when drilling!!! The picture below shows the edging tape applied all around the unit..you can if you wish only apply it to 3 sides and leave the back as there are no screws showing there.
First cut of the appropriate lengths of tape..allowing a good 2" overlap on all..as per pic.. Then Iron into position. remember no trimming required here so use the edge of the top to be level with.
As the pics show..only apply heat to the areas shown in red..do not iron near the ends YET.
As the pics show..only apply heat to the areas shown in red..do not iron near the ends YET.
Overlap all the corners as per the pic..then as shown. using a straight edge ruler to guide you. and the Stanley Knife..score through the meeting edges as shown..remove the offcuts and then iron over the newly mitred corners. Do this all round and your top should now look like this.
GLASS RUNNERS
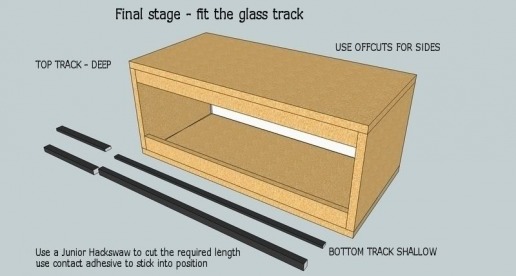
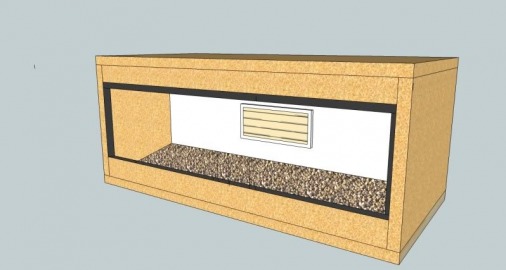
Grab your JUNIOR HACKSAW and start with the bottom track (THE SHALLOW ONE) . To get this correct. first cut a piece slightly longer than required (about 1") as this makes it easier to work with, then offer up the track into position. upside down ! and lie on the extreme edge of the bottom plinth. score with the Stanley at the other end to mark the cut point. Then cut with the Junior Hacksaw. This should give you a nice tight fit with no gaps..Do the same with the top piece (THE DEEP ONE). Then apply CONTACT ADHESIVE along the length of the runner. and do the same along the edge being applied to on facia panel.Wait 10mins as before..and apply.
You will be left with 2 offcuts. one of each thickness.. You can if you wish buy extra tracking that matches,,but seems like a waste..so use these 2 offcuts for side runners..cut as before and apply.
You will be left with 2 offcuts. one of each thickness.. You can if you wish buy extra tracking that matches,,but seems like a waste..so use these 2 offcuts for side runners..cut as before and apply.
GLASS?
You will need 2 x pieces of 4mm glass . Each piece needs to be 420mm long
This you should get from a local Glazier. (SHOP AROUND FOR THE BEST PRICES) I would expect this to cost no more than £12 for both pieces supplied cut and with the edges smoothed off. (DO NOT ASK FOR POLISHED EDGES . ITS EXPENSIVE AND NOT NECCESSARY) Advse the glazier what the glass is for and he should happily smooth off the edges at no additional cost.
THE CRITICAL MEASUREMENT? THE HEIGHT OF THE GLASS.
The bit everybody seems to get wrong..I can`t give you this, as this measurement depends entirely on accurate cutting of the wood. sizes/ build quality etc..so to help you get this right..
First measure from the top of the bottom runner to the bottom of the top runner in MILLIMETRES. Then add 8mm to that figure..that should be right!
Working on the basis that the bottom runner is normally 5mm deep and the top runner is 10mm deep. if you add 5mm toyour measurement that allows for the glass to sit in the lower runner. then add an extra 3mm (TOTAL 8mm)to account for the glass to sit in the top runner..yet leave sufficient to lift up and remove.
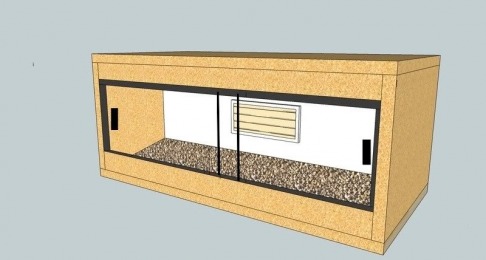
So stick in the glass..stick on the self adhesive door handles. pop on the 2 end screw covers at the side....and THAT IT!!
YOU NOW HAVE BUILT YOUR OWN VIVARIUM.
TOTAL EXPENDITURE
FURNITURE BOARD £22.00 approx
W/F HARDBOARD £ 5.00
EVOSTIK £ 2.09
SCREWS £ 2.09
PANEL PINS £ 1.69
EDGING STRIP £ 3.98
SCREW CAPS £ 1.50
LOUVRE VENT £ 3.79
TRACKING £ 5.50 INCL DELIVERY
STICKY HANDLES £ 1.20 INCL DELIVERY
GLASS DOORS £ 12.00 OR LESS
COMBINED TOTAL £ 60.00 ISH
This amount could easily be reduced by up to £10 by shopping around.
If built in plain WHITE BOARD the cost reduces down to £48 (HOMEBASE PRICES)
A heartfelt thank you to the many helping to build this site.
HOME
HOME
